Knitting can be a great way to make your own clothing, soft furnishings and even toys for the children in your life. Knitting can also offer a number of health benefits Trusted Source 5 Amazing Benefits Of Having Knitting As A Hobby It is often said that keeping busy keeps you away from trouble, boredom and even illness. Nothing could be truer when it comes to knitting. theknittingspace.com including stress reduction and lowering the risk of developing stiffness in your hands.
However, if you’re a knitting newbie, you may feel a little intimidated about learning how to read knitting patterns. If you’ve browsed a few patterns at your local craft store, it may seem like a complicated code or a strange language that you make any sense of. Fortunately, there are some simple ways to learn how to read patterns, which we will explore in more detail now.
 In addition to the basic tools, you will need to understand the key elements of a knitting pattern before you begin.
This is one of the first things you’re likely to see on a knitting pattern. Once you’ve looked at a picture of the finished piece, you should be able to see the skill level, so you can find out if the pattern is advanced, intermediate or suitable for beginners.
Some companies use a scale of one to four indicating the difficulty. Level one patterns are likely to contain fewer types of knitting stitches and an easier to follow pattern. So, it is a good idea to stick with the lower level patterns to start.
This is not immediately important, since you’re likely to be making scarves and other basic pieces as your beginning knitting projects. However, as you develop your skills, you will need to check the size of your knitting pattern to ensure that it will fit you. For sweaters or other clothing items, usually the manufacturer will provide a range of sizes, with varying instructions according to which size you want to make.
Like the size, this won’t be important initially, but checking the gauge is a good habit to develop. The gauge is important for shaped and fitted knitted items and it is usually indicated as a measurement. For example, 10 rows of six stitches will equal four inches in pattern on size 13 needles.
There should also be extra pattern information. This should include the type of yarn used and how much you will need, the size of needles, diagrams and possibly step by step photos. This helps to flesh out the knitting pattern and make it easier to follow. Beginner patterns typically have more detail, but as you gain confidence, you may find the more advanced patterns contain less additional information.
 To master how to read knitting patterns for beginners, you need to understand the common abbreviations. These abbreviations represent techniques, actions and stitches you will need as you knit.
The abbreviations form a knitting shorthand that is easier to understand and concise. For example, rather than saying knit one, purl one, knit and purl and continue to the end of the row, which takes up a lot of space, a simpler, shorter and clearer K1, P1 rep to end of row is used.
Without abbreviations, a knitting pattern would be dense and extremely long, which would be difficult to understand for even the most experienced knitter. While these abbreviations may seem confusing at first, they are likely to become a second language for you, which will help you to read even the best knitting book.
While there are no standard abbreviations, there are common abbreviations that are used whether you want to learn how to read knitting patterns, continental knitting or basic knitting.
RS: Right Side
WS: Wrong Side
K: Knit stitch
P: Purl Stitch
CO: Cast on
BO: Bind off or cast off
Inc: Increase or add more stitches
Dec: Decrease your stitches
Rep: Repeat
Sl: Slip a stitch or a number of stitches from one needle without working them
YO: Yarn over or take the yarn over your needle
Tog: Together, so work the number of stitches together to form a decrease
Work Even: Continue as you were without increasing or decreasing
Maintain Pattern: This is usually for pattern stitches, so you will keep the center of the pattern as already set up, adding or subtracting stitches without disturbing your pattern.
At the Same Time: This is used when you work two different steps, like when you shape a neckline with double pointed needles at the same time.
Work Same as Left (or Right) Reversing: This may be difficult for a beginner to grasp, but it simply means that you will work the right side, the same as the left in reverse. This saves space on the pattern, but you may need a pen and paper to sketch it out until you get used to the format.
Many patterns have their own abbreviations, but you can usually find a set of definitions on the page. However, you can find a complete abbreviations list here Trusted Source Standards and Guidelines for Crochet and Knitting | Welcome to the Craft Yarn Council The publishers, fiber, needle and hook manufacturers, and yarn members of the Craft Yarn Council have worked together to set up a series of guidelines and symbols to bring uniformity to yarn, needle and hook labeling, and to patterns, whether they appear in books, magazines, leaflets or on yarn labels. www.yarnstandards.com .
Knitting symbols
 As you’re familiarizing yourself with how to read knitting patterns, you will also come across some symbols. These also save space and make the patterns easier to read.
Rather than writing out the same steps over and over, an asterisk or * is used to indicate repeats. Asterisks are often used in different patterns such as ribbing.
For example, a ribbing pattern may read:
CO 20 sts
Row 1: *K2, P2 rep from * across end K2
This means that you knit two stitches, purl two stitches and repeat across the whole row until the last two knit stitches.
This is a common format, you’ll find from the Sixth and Springs Blanket Squares book, to the ribbing on the bottom of a sweater pattern.
Brackets are used as a way to enclose groups of stitches that need to be repeated a number of times. The number following the brackets will let you know how many times you need to repeat.
For example, (YO, K3 tog) 5, means that you need to yarn over, knit three stitches together and repeat four more times, so you have a total of five.
Learning how to read the instructions in parentheses in knitting patterns is crucial. However, parentheses are often used in the same way as brackets. They are used to indicate groups of stitches that need to be worked together.
If you’ve been looking at books with the different types of knitting stitches, it can be hard to put them into context of an actual pattern. You don’t need a How to read knitting patterns for dummies book, as you can read a pattern like you would a normal book.
The pattern will start at the left-hand side and the instructions move left to right. The pattern will work itself from top to bottom of your page, but the fabric is created from the bottom up. To illustrate this, we will look at a few of the most common knitting patterns.
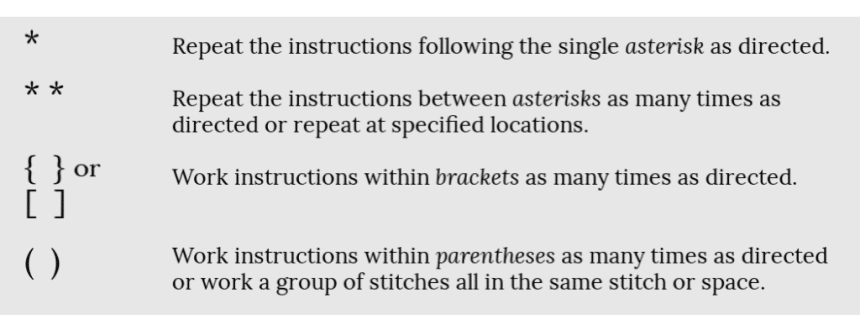
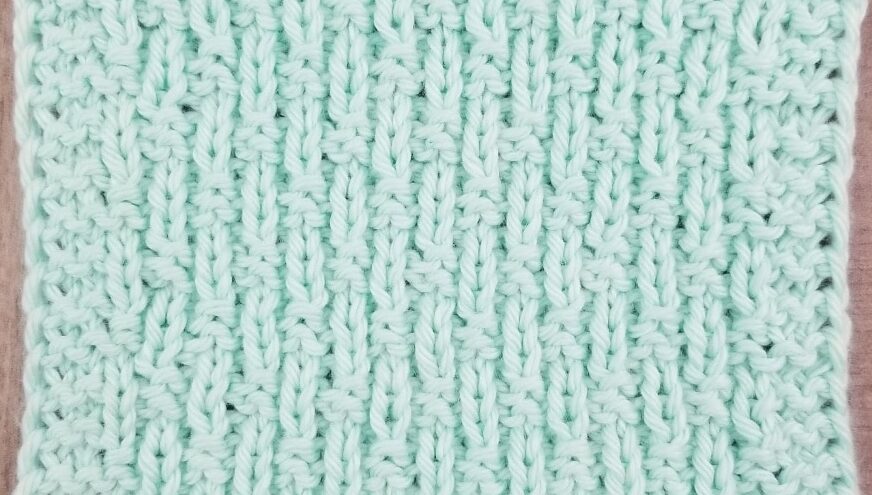
 Rib stitches create a stretchy fabric that is useful for a variety of garments. The pattern will read as follows:
CO even number of sts
Row 1: *K1, P1 repeat across row.
* repeat this x times until desired length.
This means that you need to cast on an even number of stitches. Your first row will be knit one, purl one across the whole row. You will then repeat this for the desired number of rows.
The details of what type of cast on you need or making a slip knot is not included in the instructions, as the designer assumes a basic working knowledge of knitting.
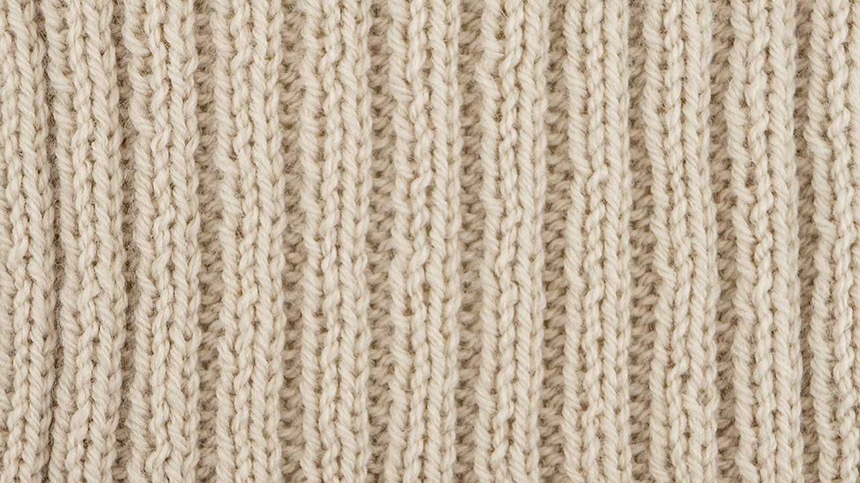
 Another example is a 2×2 rib knit, which is a four stitch repeat. You will knit two stitches, purl two stitches with a one row repeat. The pattern would read:
CO mult of 4 sts
R1: K2, P2
rep
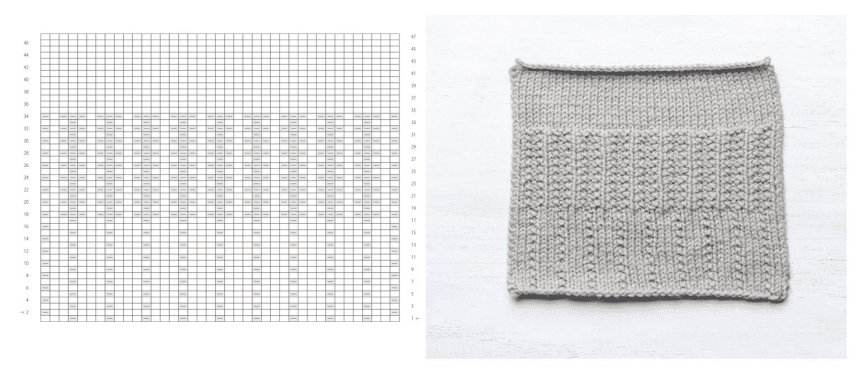
Now you’re getting the hang of basic rib stitches, we will look at a basket rib knitting pattern.
CO Multiple of 4 sts+1
Row 1: (RS) K1, *P1, K1; Repeat from *
Row 2: (WS) K2, *P1, K3*; last 3 sts, P1, K2
Row 3: P2, *K1, P3*; last 3 sts, K1, P2.
Row 4: P1, *K1, P1
Row 5: K1, *P3, K1
Row 6: P1, *K3, P1
Repeat rows 1-6 for pattern.
This pattern requires multiples of four stitches plus one. So, you can cast on any multiple of four, such as 12, 32, 48 and just add one more stitch to your number.
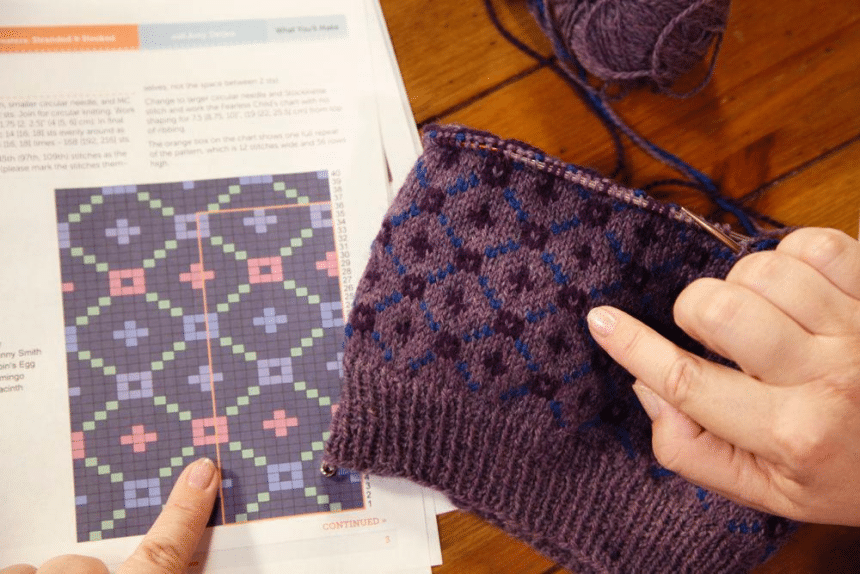
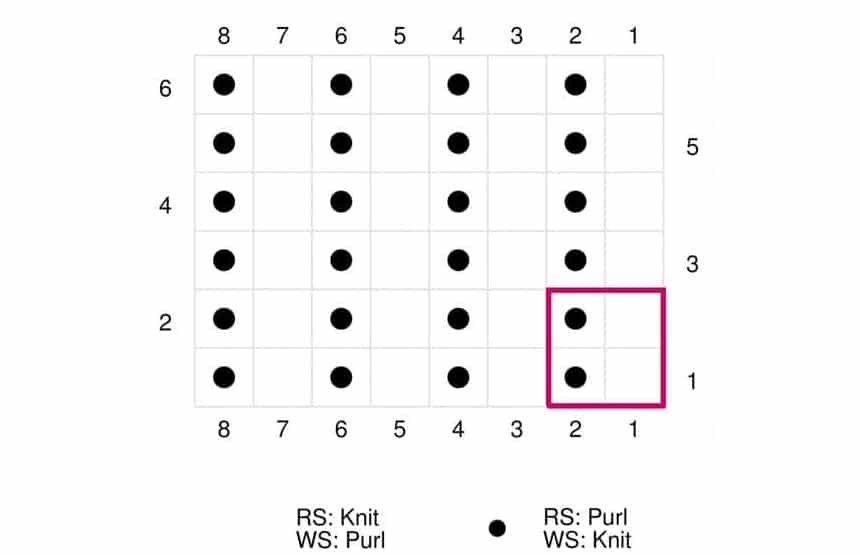
While some people are comfortable with verbal instructions, you may be a more visual person. Fortunately, knitting pattern designers have considered you and there are knitting pattern charts. If the idea of pages of written instructions leaves you in a cold sweat, you need to learn how to read knitting pattern charts.
Rather than presenting the pattern in a written format, charts provide the same information in the form of a graphic. So, several pages of written instructions are compiled into one grid.
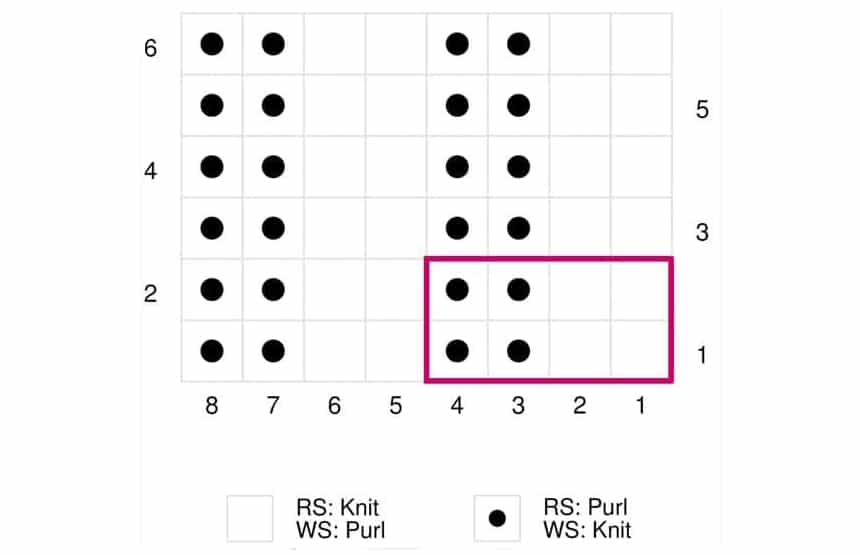
 The Squares:
When you read a knitting chart, you need to appreciate that each square represents a stitch. The color of the square or the symbol in the square indicates how to work the stitch. This will let you know whether you need to increase or decrease, change color, yarn over or other instructions.
To make it even easier, the symbols often look similar to the stitches you’re working. So, a right leaning knit two is a right leaning slash inside the appropriate square.
Although many symbols are standardized, they may vary according to the designer, so it is a good idea to check the key for the chart to understand the symbols used for the specific pattern. The key will let you know the symbols on the right and wrong side rows.
Once you get to grips with the squares, you can then appreciate that each row of squares represents a row of knitting.
In most cases, you will start reading the chart at the bottom right corner and work row by row, from the bottom of the chart to the top. There are numbers in the margins of the chart that indicate the row number.
If the piece is a knit flat pattern, you will read right side rows, right to left, like you knit. Wrong side rows are read left to right. The right side rows are in odd numbers shown along the right margin, while wrong side rows are evenly numbered along the left margin.
So, generally, you will start at 1 in the bottom right and read right to left according to the right side instructions for each symbol.
At the end of the row, work as usual, then follow the wrong side row (two) left to right according to the wrong side instructions.
If you’re struggling to read your chart, just remember to start reading each row from where the number is located.
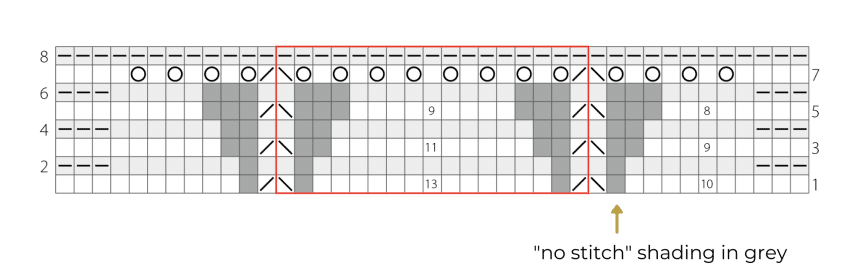 As your projects become more challenging, so will the charts and one area of particular confusion is where stitches are marked “no stitch”. What this means is that it is indicating the result of a decrease. When you decrease two or more stitches, the decrease symbol appears in just one square. So, some of the squares may show a “no stitch” symbol or gray square to account for these decreased stitches. As the pattern progresses, these gaps in the chart will be filled by increases.
So, if you do see a “no stitch” symbol, don’t panic. You just need to skip the square and move on to the next square with a symbol and it will become clear.
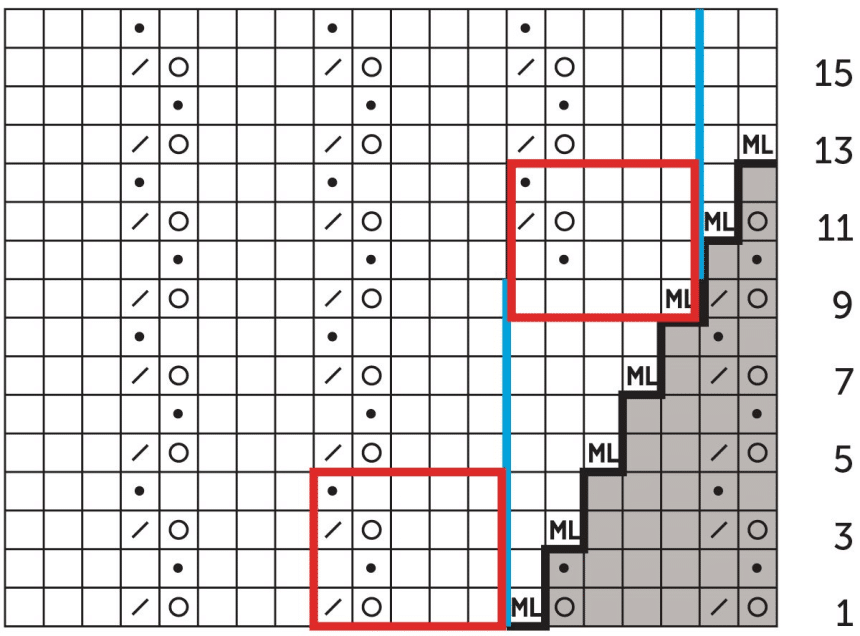 Many patterns and their associated charts include stitch repeats. The section of the repeat stitches are boldly outlined, often in red. It will indicate how many stitches will make up the repeat.
Just like a written pattern, you will need to knit to the end of the repeat section and then return to the beginning of the repeat. Continue the repeat until the number of stitches remaining on your needles equals the number shown in the repeat section of your chart.
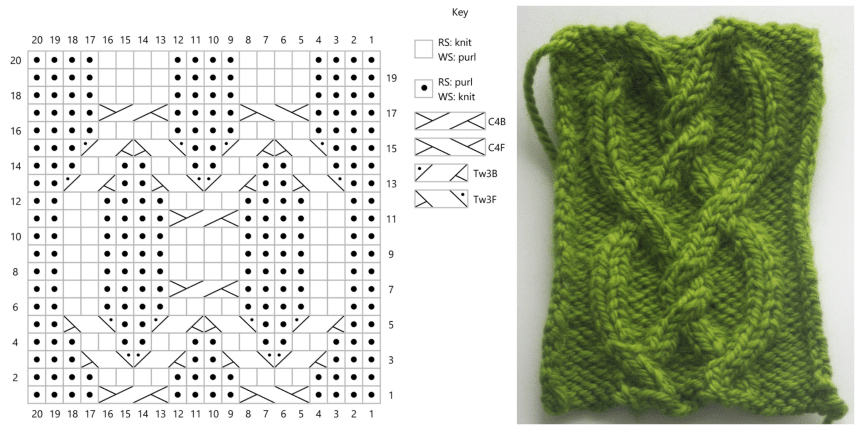 A cable in a chart is not overly complicated, but it may need a little explanation. Rather than one square with a symbol, cable symbols are as many squares as stitches wide. So, if a cable is worked over six stitches, it will cover six squares on the chart.
Additionally, a right leaning cable will have a right leaning symbol and vice versa for left cables. You should be able to find the explanation to work each cable in the pattern notes, chart key or special instructions.
If you’re struggling to follow this, try finding a simple chart. You can try a basic pattern from a chart and decide if you prefer reading a chart or using written instructions.
Knitting can be a great way to relax and keep your hands busy. Many people find themselves fidgeting if they are sitting still trying to relax, so knitting allows you to get lost in the rhythm of the needles to wind down after a stressful day. Knitting can also improve your motor skills and help maintain cognitive function.
Of course, if you want to make the most of your knitting, you will need to learn how to read knitting patterns. As we’ve explored, this isn’t as complicated as it immediately appears. Once you get confident reading the symbols, abbreviations and other knitting shorthand, you will have effectively learned a whole new language that will help you to master basic through to complex knitting techniques and patterns.
Before you know it, you could be knitting patterned sweaters for your whole family or gifting your family and friends some fantastic knitwear items.